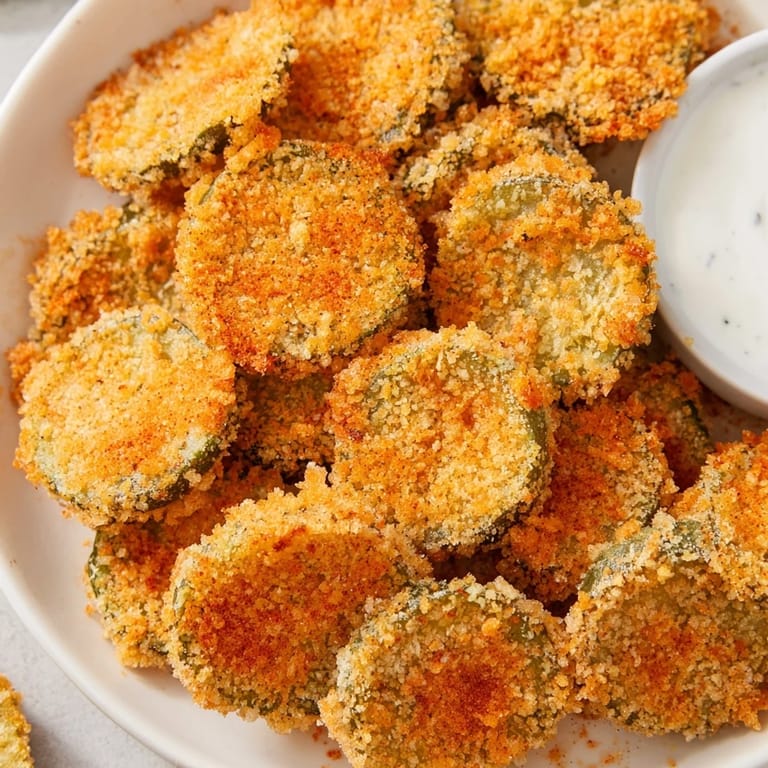
 Pin It
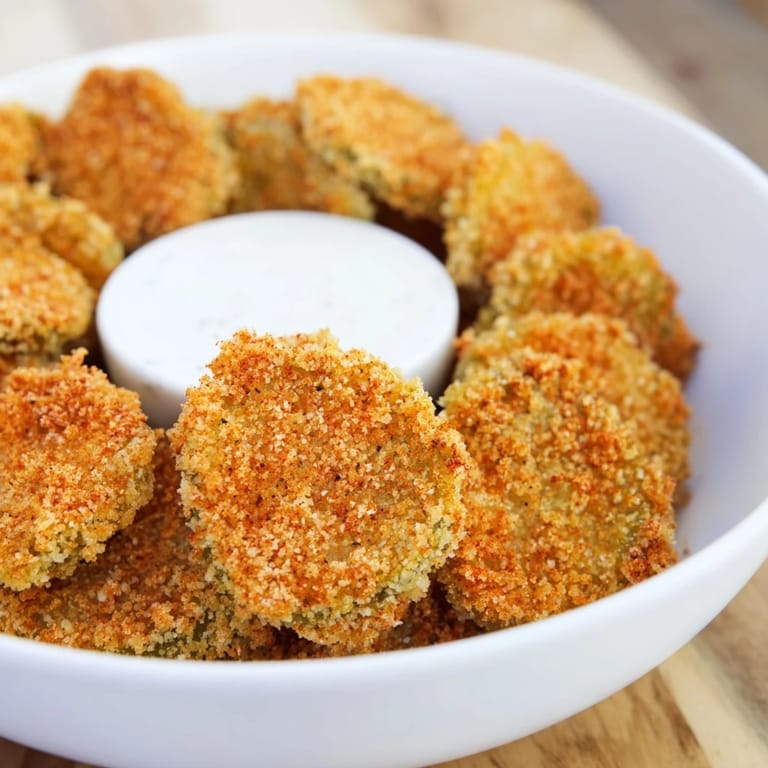
 The first time I made fried pickles, I was standing in a friend's kitchen at midnight, laughing because we'd demolished an entire jar of dill pickles within hours of dinner ending. She dared me to do something with the last handful, and I remembered seeing crispy fried pickles at a fair years ago. I pulled out her air fryer, and what emerged ten minutes later was pure magic—golden, crunchy, and so impossibly good that we both agreed it couldn't possibly be that simple. Turns out, it really is.
I brought these to a casual potluck the following weekend, tucked into a container with ranch on the side, genuinely unsure if anyone would even try them. They were gone before the appetizer round was over, with someone asking for the recipe while they were still eating. That's when I realized this wasn't just a midnight kitchen experiment—it was a keeper that would make regular appearances at gatherings.
Ingredients
- Dill pickle chips or slices (16 total): The star of the show, and this is where dryness matters more than you'd think. Pat them aggressively with paper towels because any lingering moisture will steam instead of fry, leaving you with a soggy breading.
- All-purpose flour (1/2 cup): This creates the foundation layer that helps everything stick together like a professional coating.
- Eggs (2 large) and milk (1 tablespoon): Whisked together, this becomes your adhesive that bonds the breading to each pickle slice with no gaps.
- Panko breadcrumbs (1 cup): The secret to that restaurant-quality crunch that stays crispy even as things cool slightly.
- Garlic powder (1/2 teaspoon), smoked paprika (1/2 teaspoon), and cayenne pepper (1/4 teaspoon optional): These seasonings live in your breadcrumb mixture and add complexity that makes people wonder what your secret ingredient is.
- Kosher salt (1/2 teaspoon) and black pepper (1/4 teaspoon): Balance is everything, and these prevent the breading from tasting one-dimensional.
- Cooking oil spray: A light mist is all you need to help them achieve that golden color in the air fryer.
- Ranch or dipping sauce of choice: This is non-negotiable, the perfect cool counterpoint to the warm, seasoned pickle.
Tired of Takeout? 🥡
Get 10 meals you can make faster than delivery arrives. Seriously.
One email. No spam. Unsubscribe anytime.
Instructions
- Set your stage:
- Preheat the air fryer to 400°F while you arrange three shallow bowls in assembly-line order: flour first, then your whisked eggs and milk, then the seasoned panko mix. Having everything ready before you start breading makes the whole process smooth and prevents pickle pieces from getting lost in your workflow.
- Dry the pickles thoroughly:
- This is the moment that separates mediocre from crispy. Use paper towels and don't be gentle—pat and press each pickle slice until you're confident you've removed every drop of surface moisture. Dry pickles equal crispy results.
- Coat in the three-step breading:
- Take one pickle chip, press it into the flour until both sides are covered, shake off the excess, then dip into the egg mixture so it's fully coated. Finally, press it gently but firmly into the breadcrumb mixture, making sure every surface gets covered. The pressure here helps the breading actually stick during cooking.
- Arrange and spray:
- Place your breaded pickles in a single layer in the air fryer basket without crowding. They need room to air-circulate, not stack. Give them a light spray of cooking oil on top—this helps them brown and crisp up beautifully.
- First round of cooking:
- Air-fry for 6 minutes at 400°F. You'll start to see them turning golden at the edges, which is your sign they're on track. Don't skip this checkpoint.
- Flip and finish:
- Use tongs to carefully flip each pickle slice, spray the other side lightly, and return them for another 4 to 6 minutes. Watch for that deep golden-brown color, which means the breading has crisped up completely. They should look like they came from a fair stand.
- Serve immediately:
- Transfer to a plate while they're still warm and that breading is at peak crispiness. Serve with your favorite dipping sauce right away. Procrastinating here is your enemy.
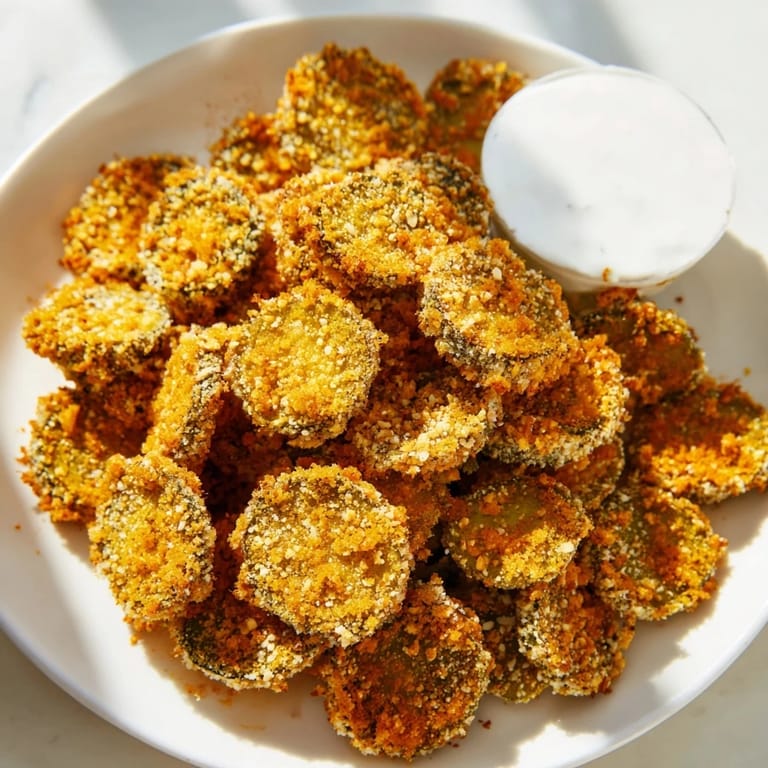
 Pin It
 I remember watching my very skeptical brother eat his first one at a family dinner, the way his expression shifted from doubtful to delighted in the space of a single bite. He asked for seconds before he'd even finished the first, and that's when I knew this recipe had earned its permanent spot in my regular rotation. It's become one of those foods where people don't just eat it—they experience it.
Variations and Customizations
The beauty of this recipe is how flexible it is once you understand the core technique. I've experimented with everything from adding a teaspoon of ranch seasoning mix directly to the panko for extra flavor, to swapping in crushed cornflakes for a gluten-free version that somehow tastes even better. Some nights I add grated Parmesan cheese to the breadcrumb mixture because I'm feeling fancy, and other times I keep it simple and let the smoked paprika take center stage. The framework stays the same, but you can easily make it your own.
Making Them Crunchier
If you're someone who believes more texture is always the answer, try double breading your pickles by running them through the egg wash and breadcrumb mixture twice. It takes an extra minute per batch, but the result is an almost impossible-to-bite-through shell that holds up beautifully even as they cool. I've also discovered that letting breaded pickles sit in the fridge for 15 minutes before air frying helps the coating set, which means it stays on and doesn't slide around during cooking.
Storage and Reheating
Leftovers are best enjoyed fresh, but life happens and sometimes you have extras sitting in your fridge the next day. The air fryer is genuinely your best friend here—pop them in at 350°F for 3 to 4 minutes and they'll crisp back up like they were just made. The oven won't cut it, and the microwave is an absolute betrayal of everything you've created. I've learned to embrace that these are best made-to-order, which is also why they're perfect for when friends drop by unexpectedly.
- Store leftover breaded pickles in an airtight container for up to 24 hours, though the breading will soften over time.
- Never use a microwave for reheating; the air fryer or regular oven at 350°F will restore their crispiness in minutes.
- If you're planning ahead, you can bread the pickles and freeze them before cooking for up to three weeks, then air fry from frozen by adding 2 to 3 extra minutes.
 Pin It
 These crispy fried pickles have become the food I make when I want to impress people without the stress, or when I want to remind myself that sometimes the simplest ideas make the best memories. They're proof that not every great recipe has to be complicated.
Recipe Questions & Answers
- → How do I ensure pickles stay crispy?
Pat pickle slices dry thoroughly before breading to prevent sogginess and help achieve a crispy coating.
- → Can I make this gluten-free?
Yes, substitute panko breadcrumbs with crushed cornflakes or gluten-free breadcrumbs for a gluten-free option.
- → What spices enhance the breading flavor?
Garlic powder, smoked paprika, cayenne pepper, salt, and black pepper create a balanced, flavorful crust.
- → Is air frying better than deep frying here?
Air frying gives a crispy texture with less oil, making it a lighter alternative while maintaining crunch and flavor.
- → Can I double bread for extra crunch?
Yes, repeat the egg wash and breadcrumb coating for an extra crispy and crunchy finish.